Title: Super Brace..
Post by: vegasda9 on July 29, 2004, 05:38:38 AM
Post by: vegasda9 on July 29, 2004, 05:38:38 AM
Does anyone have any experience with this? Propaganda or realistic expectations from this part? Comments/suggestions?
Thanks!
SuperBrace Part#: 3329
Fits Model: Suzuki GS 500E
Years: (ALL)
Price: $129.95
(http://www.superbrace.com/images/products/PIC3329_1.jpg)
SuperBrace is the leading motorcycle fork stabilizer. This patented brace provides better stability, superior aerodynamics and a more streamlined look than other multi-piece braces on the market.
Reduces low and high speed wobbles.
Improves stability in tight cornering.
Improves tire life and reduces cupping.
Decreases sensitivity to rough road surfaces and rain grooves.
Each SuperBrace is designed and manufactured for each specific motorcycle.
Every SuperBrace is made of 6061-T6 aircraft aluminum and machined to a tolerance of + or - .002 of an inch, with a polished finish.
Ten minute easy installation.
Competition proven by world class racers.
We stand behind our product with a 30 Day Money Back Guarantee. Shipping and Handling will be $10.00 USA via UPS. Call for international rates.
Title: Super Brace..
Post by: JamesG on July 29, 2004, 05:46:01 AM
Post by: JamesG on July 29, 2004, 05:46:01 AM
$130 is kinda pricy for a lump of aluminum. But the GS's forks ARE kinda flexy, which makes for interesting cornering. If you like to push your bike hard, it might be worthwhile.
Title: Super Brace..
Post by: dgyver on July 29, 2004, 05:53:36 AM
Post by: dgyver on July 29, 2004, 05:53:36 AM
$130......OUCH! Not too difficult to make one.
Title: Super Brace..
Post by: davipu on July 29, 2004, 06:10:53 AM
Post by: davipu on July 29, 2004, 06:10:53 AM
mister manufacturer (Sirinath) made some a while back, I don't remember if he had any left though.
Title: Super Brace..
Post by: cozy on July 29, 2004, 06:44:38 AM
Post by: cozy on July 29, 2004, 06:44:38 AM
Spend $60 and get progressive fork springs , you'll get close to the same result stability - wise. then you can spend $70 on something else like better handlebars or a real rear shock.
Title: Super Brace..
Post by: dgyver on July 29, 2004, 06:53:44 AM
Post by: dgyver on July 29, 2004, 06:53:44 AM
Stiffer springs will not help fork flex.
Title: I think...
Post by: The Buddha on July 29, 2004, 07:23:53 AM
Post by: The Buddha on July 29, 2004, 07:23:53 AM
I think I have one left ... $40 + shipping. I have to tell you... the holes for the fork bolts have to be cardboard transfered for max effect... OK I can pre drill them a little big... but that in effect eats away at the effectiveness... and no doubt they have drilled it... but I thought I'll give you the option. So mine are drill and bolt... not ready to bolt.
Cool.
Srinath.
Cool.
Srinath.
Title: Super Brace..
Post by: cozy on July 29, 2004, 07:44:35 AM
Post by: cozy on July 29, 2004, 07:44:35 AM
OK so then what moves when your forks flex? Is such movement independant of all suspension components sans the brace?
Title: Super Brace..
Post by: dgyver on July 29, 2004, 08:13:17 AM
Post by: dgyver on July 29, 2004, 08:13:17 AM
Stiffer springs give a psuedo effect of less flexing. The wheel will tend track in vertical motion better due to the heavier springs. There is less chance that the lower forks will try to move at different rates.
But the tubes themselves will flex. Remember that they are only 37mm in diameter. The other internal components of the forks have to have some clearance to move. So as they wear, the tolerances increase and more flex.
A stiffer brace will keep both the forks operating at the same time.
But the tubes themselves will flex. Remember that they are only 37mm in diameter. The other internal components of the forks have to have some clearance to move. So as they wear, the tolerances increase and more flex.
A stiffer brace will keep both the forks operating at the same time.
Title: Braking...
Post by: The Buddha on July 29, 2004, 08:15:25 AM
Post by: The Buddha on July 29, 2004, 08:15:25 AM
OK the brakes will push the right lower forward, and that makes the wheel go off a bit to the left. The fork brace will make the right one not go anywhere wihtout the left... and that extra width between the forks and the uppers etc will prevent it from moving much. If you want to know how much the handling is affected by the brace... take your brace and fender off and ride it.. Much worse than with... even that thin one.
Cool.
Srinath.
Cool.
Srinath.
Title: Super Brace..
Post by: cozy on July 29, 2004, 09:12:09 AM
Post by: cozy on July 29, 2004, 09:12:09 AM
Ah yes now it makes sense.
Thanks both of you guys, i love this site. Free worhtwhile info. My tuition just went up 4.5% for fall term. Conversely, motorcycle college has cost me almost nothing. :cheers:
Thanks both of you guys, i love this site. Free worhtwhile info. My tuition just went up 4.5% for fall term. Conversely, motorcycle college has cost me almost nothing. :cheers:
Title: The bike...
Post by: The Buddha on July 29, 2004, 10:22:24 AM
Post by: The Buddha on July 29, 2004, 10:22:24 AM
JamesG... the bike in your avatar is actual size ??? :lol: :lol: :lol: ...
Cool.
Srinath.
Cool.
Srinath.
Title: Super Brace..
Post by: JamesG on July 29, 2004, 10:27:13 AM
Post by: JamesG on July 29, 2004, 10:27:13 AM
hehe caught me playing with the avatar eh?
Notice anything missing on that bike?
Notice anything missing on that bike?
Title: Super Brace..
Post by: dgyver on July 29, 2004, 10:31:30 AM
Post by: dgyver on July 29, 2004, 10:31:30 AM
exhaust
Title: Super Brace..
Post by: Blueknyt on July 29, 2004, 10:34:43 AM
Post by: Blueknyt on July 29, 2004, 10:34:43 AM
no handrail, no mirrors, no rear fender
Title: Super Brace..
Post by: Rema1000 on July 29, 2004, 10:46:06 AM
Post by: Rema1000 on July 29, 2004, 10:46:06 AM
I have wondered if you couldn't get the same effect by measuring the distance between bolts front-left to front-right, and rear-left to rear-right; then cut and drill a piece of angle iron to go between the front holes, and another piece to go between the rear holes. Once the two brackets are screwed onto the forks, you can drop-in a 3x5-inch plate of steel and spot weld to the two pieces of angle iron, to link them together.
If you care how it looks, take it off, fill it with bondo and paint it black (leave holes in the bondo for the screws).
EDIT: you'd end-up with something shaped sorta like a soap dish
If you care how it looks, take it off, fill it with bondo and paint it black (leave holes in the bondo for the screws).
EDIT: you'd end-up with something shaped sorta like a soap dish
Title: Super Brace..
Post by: JamesG on July 29, 2004, 10:59:17 AM
Post by: JamesG on July 29, 2004, 10:59:17 AM
Alot of extra work, when all you have to do is nab a chunk of 1/4" 6061 plate off ebay and whittle it down to the right shape.
Avatar bike - Yeah I was playing around with the index page's photo in paintshop. Looking at what the bike would look like cleaned up and with a Buellish underbelly exhaust. Liked it so much I made an avatar out of it.
As I'm (re)building my race bike this winter, I may buy an "F" and make an uber-street GS out of it.
:)
Title: Super Brace..
Post by: dgyver on July 29, 2004, 11:03:03 AM
Post by: dgyver on July 29, 2004, 11:03:03 AM
an undertail exhaust is in the plans for my 94, have not worked out much of the details yet.
Title: 1/2 inch...
Post by: The Buddha on July 29, 2004, 11:08:40 AM
Post by: The Buddha on July 29, 2004, 11:08:40 AM
I used 1/2 inch thick 6061 T6... you can actually do it with a hole saw... or even a jig saw if you are careful. The sides can be a little jagged/crooked...
Cool.
Srinath.
Cool.
Srinath.
Title: Super Brace..
Post by: Blueknyt on July 29, 2004, 10:11:33 PM
Post by: Blueknyt on July 29, 2004, 10:11:33 PM
Quotean undertail exhaust is in the plans for my 94, have not worked out much of the details yet
howabout flipping the head around, and making ram air, and pipes straight out the back. figure the head dont care which direction the cams turn (tach drive aside) aslong as intake opens right after exhaust, might have to swap coil signal wires from left to right making #1 on the right instead
Title: Super Brace..
Post by: JamesG on July 30, 2004, 04:53:47 AM
Post by: JamesG on July 30, 2004, 04:53:47 AM
I looked at that. The frame gets in the way, You would have to cut and redesign the downtubes or figure a way to duct the carbs around them, which would nullify any advantage from doing it.
Title: Re: I think...
Post by: Flash on July 30, 2004, 08:39:42 PM
Post by: Flash on July 30, 2004, 08:39:42 PM
Quote from: seshadri_srinathI think I have one left ... $40 + shipping. I have to tell you... the holes for the fork bolts have to be cardboard transfered for max effect... OK I can pre drill them a little big... but that in effect eats away at the effectiveness... and no doubt they have drilled it... but I thought I'll give you the option. So mine are drill and bolt... not ready to bolt.Srinath is right. Ideally, you do not want any movement or shifting from the fork brace under stress. The stock fork brace has holes that are slightly slotted to ensure compatibility during installation (sloppy manufacturing practices IMO --> no spec standards?). This only complicates the original problem of the fork brace being too thin.
Cool.
Srinath.
I am living proof that the stock fork brace is CRAP. I had a 10mph spill in rain a couple of months back and it just stripped the bolts from their holes (my second spill). It looked just like the picture below:

As hard as I ride on the highway I wasn't about to take my GS back on the road until I fixed the brace. I didn't want to waste my money on another stock fork brace (I even thought about stacking two together) and I wasn't real crazy about shelling over $130 for that aftermarket brace mentioned above. Therefore, I ended up having a friend and machinist fabricate one for me. It is 1/2" thick and the holes are exact. Here is a pic of it:
If youre lucky enough to have a fellow machinist as a friend, then have them make one cheap. Otherwise, buying one from Srinath for $40 sounds lika a good deal.
Does anyone have any opinion/reviews/pics on Srinath's custom fork brace?
Title: Re: I think...
Post by: Flash on July 30, 2004, 08:39:59 PM
Post by: Flash on July 30, 2004, 08:39:59 PM
oops
Title: Re: I think...
Post by: jaybee333 on June 30, 2005, 07:51:17 PM
Post by: jaybee333 on June 30, 2005, 07:51:17 PM
Quote from: seshadri_srinathI think I have one left ... $40 + shipping. I have to tell you... the holes for the fork bolts have to be cardboard transfered for max effect... OK I can pre drill them a little big... but that in effect eats away at the effectiveness... and no doubt they have drilled it... but I thought I'll give you the option. So mine are drill and bolt... not ready to bolt.
Cool.
Srinath.
:) Srinath, I want to make my own 1/2in. aluminum fork brace. Will you please describe the 'cardboard transfer' method for exactly placing the bolt holes on the new brace.
Or any other knowledgeable member, please explain method.
I got a great chunk of aluminum 1/2 X 3 X 6 on ebay for $15.80 shipped!
Thank You ;)
Title: Mill
Post by: The Buddha on June 30, 2005, 08:56:28 PM
Post by: The Buddha on June 30, 2005, 08:56:28 PM
You need to machine out the outline of the brace on the new material, then the cardboard transfer (Put card board under the brace and press it in and hold it in place and mark it from the bottom) ... and then drill the holes in the aluminium.
Cool.
Srinath.
Cool.
Srinath.
Title: Super Brace..
Post by: jaybee333 on June 30, 2005, 09:40:28 PM
Post by: jaybee333 on June 30, 2005, 09:40:28 PM
:) Thanks Srinath. I'll post here with the results when it's done. ;)
Title: Super Brace..
Post by: cobalt135 on June 30, 2005, 11:55:56 PM
Post by: cobalt135 on June 30, 2005, 11:55:56 PM
Can you cut 1/2" aluminum with a jig saw (Sabre Saw) with a metal blade installed? Never tried to cut metal that thick with one. :dunno:
Title: Super Brace..
Post by: dgyver on July 01, 2005, 06:11:00 AM
Post by: dgyver on July 01, 2005, 06:11:00 AM
You can but take it slow. I usually use either a vertical band saw or a porta-band to cut small aluminum pieces.
I had a bad day a work yesterday. So for therapy, I made a left side rearset last night. All I used was a porta-band, drill press with a hole saw and a couple of sanders. Not production work capabilities but the results look good. Took about 1 hour.
I had a bad day a work yesterday. So for therapy, I made a left side rearset last night. All I used was a porta-band, drill press with a hole saw and a couple of sanders. Not production work capabilities but the results look good. Took about 1 hour.
Title: Super Brace..
Post by: jaybee333 on July 01, 2005, 06:21:43 AM
Post by: jaybee333 on July 01, 2005, 06:21:43 AM
:) That's a good question Cobalt. I was wondering that myself. Has anybody cut out the curves on the 1/2in. aluminum for the fork brace with a electric jig saw? In one of Srinath's posts on the subject he mentioned something about using a hole saw :o . I have a nice piece of 1/2 X 3 X 6, cut at the supplier, that cost me $15.80, shipped. Does anyone know a ballpark figure as to how much a machine shop would charge to machine out the big curves at each end? ;)
Title: Hole saw
Post by: The Buddha on July 01, 2005, 06:39:17 AM
Post by: The Buddha on July 01, 2005, 06:39:17 AM
Quote from: jaybee333:) That's a good question Cobalt. I was wondering that myself. Has anybody cut out the curves on the 1/2in. aluminum for the fork brace with a electric jig saw? In one of Srinath's posts on the subject he mentioned something about using a hole saw :o . I have a nice piece of 1/2 X 3 X 6, cut at the supplier, that cost me $15.80, shipped. Does anyone know a ballpark figure as to how much a machine shop would charge to machine out the big curves at each end? ;)
With a hole saw the piece will have to be longer so you can cut a full hole ... you cant cut 1/2 the hole with a hole saw ... and the good alloys of aluminium are harder to machine ... will eat a holesaw ... whihc is meant for wood BTW ...
With any hand tool even a vertical saw ... you'll not cut nice smooth holes ... they'd need further grinding etc to make it look nice ... but its going to be 90% covered ... so big deal ...
Cost - I believe it will cost you more than the $40 I sell them for ... BTW I found 1/2 dozen braces from last years's run ... these are 1/2 inch and made of 7075 ... $40 and shipping. I have no mounting holes ... so cardboard transfer to your hearts content ... Might as well put a for sale notice I guess ...
Cool.
Srinath.
Title: Re: Hole saw
Post by: dgyver on July 01, 2005, 06:45:20 AM
Post by: dgyver on July 01, 2005, 06:45:20 AM
Quote from: seshadri_srinathWith a hole saw the piece will have to be longer so you can cut a full hole ... you cant cut 1/2 the hole with a hole saw ... and the good alloys of aluminium are harder to machine ... will eat a holesaw ... whihc is meant for wood BTW ...
I cut 1/2 circles last night with a hole saw. The aluminum piece has to be mounted to a board and clamped down to the drill table. I have done dozens of times.
Not all holes saws are made for wood. I have used hole saws on schedule 40 steel pipe plenty of times. Bi-Metal hole saws do cost more.
Title: Super Brace..
Post by: jaybee333 on July 01, 2005, 06:53:42 AM
Post by: jaybee333 on July 01, 2005, 06:53:42 AM
:) Great info Guys! What size holesaw for the correct depth of curve on the 1/2in. thick aluminum plate? ;)
Title: Re: Hole saw
Post by: The Buddha on July 01, 2005, 07:14:41 AM
Post by: The Buddha on July 01, 2005, 07:14:41 AM
Quote from: dgyverQuote from: seshadri_srinathWith a hole saw the piece will have to be longer so you can cut a full hole ... you cant cut 1/2 the hole with a hole saw ... and the good alloys of aluminium are harder to machine ... will eat a holesaw ... whihc is meant for wood BTW ...
I cut 1/2 circles last night with a hole saw. The aluminum piece has to be mounted to a board and clamped down to the drill table. I have done dozens of times.
Not all holes saws are made for wood. I have used hole saws on schedule 40 steel pipe plenty of times. Bi-Metal hole saws do cost more.
How thick was the plate you were cutting it in ... and yea pipe yes ... Basically you need a spot for the centering drill to get into then the hole saw will stay in place, use cutting fluid, motor oil and go slow ... but wihtout a place for the center you're hole saw will get pushed out ...
BTW you'd need a 2 inch holesaw I think ... but I've never done with hole saw ...
Cool.
Srinath.
Title: Super Brace..
Post by: dgyver on July 01, 2005, 07:32:23 AM
Post by: dgyver on July 01, 2005, 07:32:23 AM
I was cutting 1/2" 6061 aluminum.
The largest metal hole saw I have is 2". IIRC, I had to use a drum sander to remove some of the material on the last brace that I made to fit around the fork tubes. But then this was Katana forks. Not sure if the Kat lower tube is larger in OD, eventhough they use the same fender mounting plate as the GS.
The largest metal hole saw I have is 2". IIRC, I had to use a drum sander to remove some of the material on the last brace that I made to fit around the fork tubes. But then this was Katana forks. Not sure if the Kat lower tube is larger in OD, eventhough they use the same fender mounting plate as the GS.
Title: Then
Post by: The Buddha on July 01, 2005, 07:51:18 AM
Post by: The Buddha on July 01, 2005, 07:51:18 AM
OK then you have a spot for the centering hole to get a good penetration on ??? if you did ... no problem, drill will help keep the hole saw in place. he's got 6 inch wide, the plate needs to be 5 inch wide, there isn't a spot for the drill to fully locate itself in ...
Cool.
Srinath.
Cool.
Srinath.
Title: Super Brace..
Post by: jaybee333 on July 01, 2005, 07:58:11 AM
Post by: jaybee333 on July 01, 2005, 07:58:11 AM
:thumb: Thanks for all the info. This forum rocks! I will now procede with the fork brace mod, with confidence! ;)
Title: Super Brace..
Post by: aplitz on July 02, 2005, 02:31:17 AM
Post by: aplitz on July 02, 2005, 02:31:17 AM
I really liked the one that I put on my GS. A racer had it made for his GS, and I put it on my bike when he parted his. Link: //www.pbase.com/aplitz
I payed way less than $130, more like $60 shipped.
I payed way less than $130, more like $60 shipped.
Title: Super Brace..
Post by: Zilla on July 02, 2005, 03:49:51 AM
Post by: Zilla on July 02, 2005, 03:49:51 AM
Got a Superbrace off Ebay for 30. Haven't gotten it all the way installed yet. It's definately in there tight. The stock one was pretty messed up. Bolt holes elongated, etc.
Title: Re: I think...
Post by: Zilla on July 02, 2005, 04:14:57 AM
Post by: Zilla on July 02, 2005, 04:14:57 AM
I am living proof that the stock fork brace is CRAP. I had a 10mph spill in rain a couple of months back and it just stripped the bolts from their holes (my second spill). It looked just like the picture below:
Quote
Hey, that looks like my stock fork brace!!!!
Title: Super Brace..
Post by: 500rider on July 02, 2005, 06:42:32 AM
Post by: 500rider on July 02, 2005, 06:42:32 AM
What about flatness?
I was thinking about getting a brace made from flat ground stock for my Katana. It has the exact same fork brace. Did anybody making a custom fork brace notice that it doesn't quite sit flat?
BTW, the fork brace has a diameter of 2.58" around the fork tube.
I was thinking about getting a brace made from flat ground stock for my Katana. It has the exact same fork brace. Did anybody making a custom fork brace notice that it doesn't quite sit flat?
BTW, the fork brace has a diameter of 2.58" around the fork tube.
Title: Fork Brace
Post by: galahs on September 12, 2007, 02:06:34 AM
Post by: galahs on September 12, 2007, 02:06:34 AM
Yesterday I installed a Fork Brace I purchased from chuck81 (http://gstwins.com/gsboard/index.php?action=profile;u=4954)
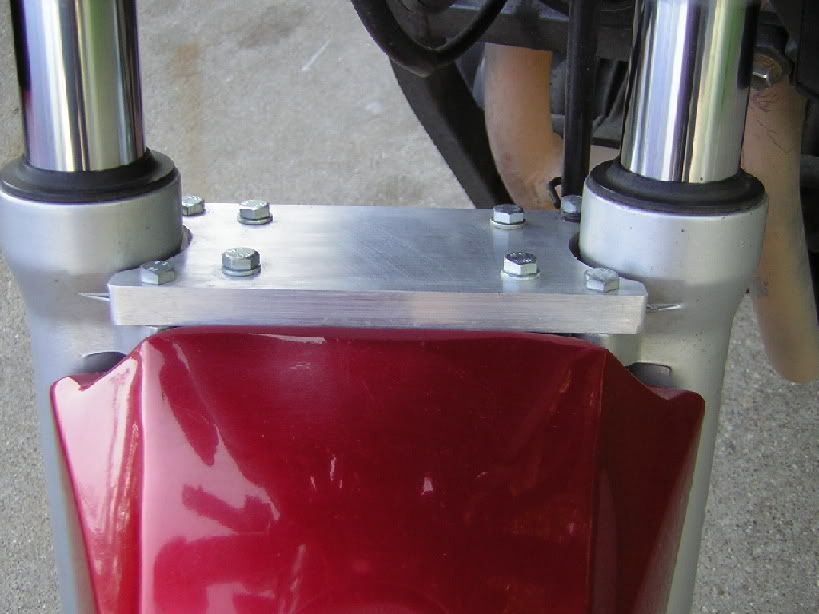
First off can I say its an excellent piece of engineering.
Chuck's brace
- is 12mm thick compared to 2.5mm for the stock brace.
- holes are round and in exact locations unlike the elongated oval holes on the stock brace
- has a nice rounded front edge for aerodynamics
- came with longer alan head stainless steel bolts to replace the brace and fender bolts
(http://img166.imageshack.us/img166/3241/forkbraceke6.jpg)
I tried to take a short cut by removing the brace without taking off the front wheel :icon_rolleyes:
Some short cut!!!
I used a long reach 8mm spanner to hold the fender nuts. It was a tight difficult task to access the nuts between the fender and the tyre and then trying to use an alan key to remove the bolts.
After a long battle I got all 4 of them.
Next, to remove the fork brace screws.
I got the two left hand screw out with just a little force on the alan key.
The right hand ones were near impossible! :mad:
So I got a hacksaw blade, and cut a slot into both bolts heads. Tried using a screw driver to remove them. Nope! Still wouldn't budge. :icon_twisted:
So I got a hammer and chisel and banged in under the screw heads, till they lifted a little. I then grabbed the screws with some vice grips and 1/4 turn at a time (painstaking! ) removed the screws.
Lifting the frame brace straight up and off, I could then rotate the fender forward to remove it. I also removed the attached speedo cable holder and disposed of it (don't want anything there that may loosen the grip of the bolts onto the brace)
i then tested to ensure the new frame brace's holes lined up. They did!!! :thumb:
I removed the new frame brace again, placed it on the ground upside down, with the 4 brace screws poking up through it.
I then laid the fender upside down onto the new brace, allowing the screws to penetrate through. To give me an exact positioning of the screws.
I then inserted the fender washer onto the screw and super-glued it to the fender. After they dried I threaded on the bolts and super-glued them to the washer :icon_mrgreen: (make sure you don't glue the screws to the bolt or washer! )
After they dried I un-screwed the screws.
( Now I didn't have to worry about trying to get the bolts onto the screws when I tried to reinstall the fender! They will be held nicely in place as I thread the bolts in )
I put the fender into position on the tyre.
Now I installed the new brace to the bike and screwed each screw in lightly (4 turns) working in a diagonal pattern to ensure they all lined up correctly.
I then raised the fender so it would line with the brace holes and lightly threaded the fender screws into the bolts glued to the fender. I tightened each screw lightly, then started to torque each down. The glue's hold breaks under the strain and now its just a simple case of using a long reach 8mm spanner to give them their final tighten.
I then torqued down the brace bolts.
DONE!!!!
Title: Re: Super Brace..
Post by: galahs on September 12, 2007, 02:21:41 AM
Post by: galahs on September 12, 2007, 02:21:41 AM
Here's what SuperBrace say an upgraded Fork Brace does.
# Reduces low and high speed wobbles.
# Improves stability in tight cornering.
# Improves tire life and reduces cupping.
# Decreases sensitivity to rough road surfaces and rain grooves.
http://www.superbrace.com/proddetail.asp?prod=3329
What does a fork brace do? Basically it forms a bridge between your forks, increasing their rigidity. Fork tubes without a fork brace installed have two points where they are connected - at the top near your handlebars and at the bottom near the front wheel. Under stress from high speeds, off-roading or hard braking the front forks can flex between the top and bottom connections. This results in decreased handling, speed wobbles, tire cupping, increased sensitivity to rough road surfaces, decreased stability in tight cornering, etc.
Smaller diameter fork tubes are more likely to flex than thicker ones, and the GS is renowned for having relatively small 37mm fork tubes.
I did some for and after testing with the stock and chuck81's brace and I have to say on rough sweeping country roads the front definitely feels tighter and gives more feedback.
Love it!
The only downside to an upgraded fork brace is it contributes a little more to the front wheels un-sprung weight, and the increased stiffness makes the ride a little rougher (very acceptable though)
Title: Re: Super Brace..
Post by: galahs on September 16, 2007, 03:55:57 AM
Post by: galahs on September 16, 2007, 03:55:57 AM
Went for a weekend of hard riding on some very technical back roads.
The beefy new brace has given me so much more feel than the tin foil stocker!
You can feel the front tyres grip on the road and its feeback of when the front starts slipping is instantaneous and very progressive. FANTASTIC!
The only down side is the older tin foil brace was more forgiving if you picked a bad lean angle into a bumpy corner. The new one means your front end does exactly what its told even if what you are telling it is beyond your tyres traction ability.